

Keys to get good photos on the Google Pixel
There are many elements that come into play when taking a photo with your mobile, although we are going to have to worry much less about all of them with the help of the smartphone artificial intelligence. You just have to aim, follow the instructions that appear in the camera app and choose the best plane.
better take
This is, in my opinion, one of the most useful tools that we find in Google phones. It is based on multi-frame recording, which helps us always find the best shot. To put it into operation, you just have to enter the camera app, tap on the top gear and put the ‘Best shot’ mode on automatic or on.
Our recommendation is that we leave it automatic and it is the smartphone that puts it into operation when there is a lot of movement or changes. This will also save us from taking up extra space on the device. Once we have the photograph, we will only have to enter the Google Photos app and within each one, in the Movement section, we can change the shot for another in which Let’s not go out with our eyes closed or in a bad postureproceeding to export the frame that we like the most.
More light
In photography, light is a crucial issue and Google knows it, which is why it has 3 different photography modes. We find these possibilities again in the upper options within the camera, where we will be able to choose the one that best suits us according to the moment:
- No: without applying any light enhancement instantly, perfect for achieving a result identical to what we see with our eyes.
- Night vision: automatically applies HDR to see much more detail.
- Flash: the classic option that provides artificial light.
dirty lens warning
One of the factors that is most often to blame for poor photography is dirt. Having the smartphone in hand for so long, it is very easy for us to stain the cameras, therefore, when taking the picture we are losing sharpness and a good snapshot for not stopping for a few seconds to clean it. Google has in its possession a technology capable of noticing and notifying us with a sign on the screen, so that we can clean the camera by simply wiping it with a cloth or the shirt we are wearing.
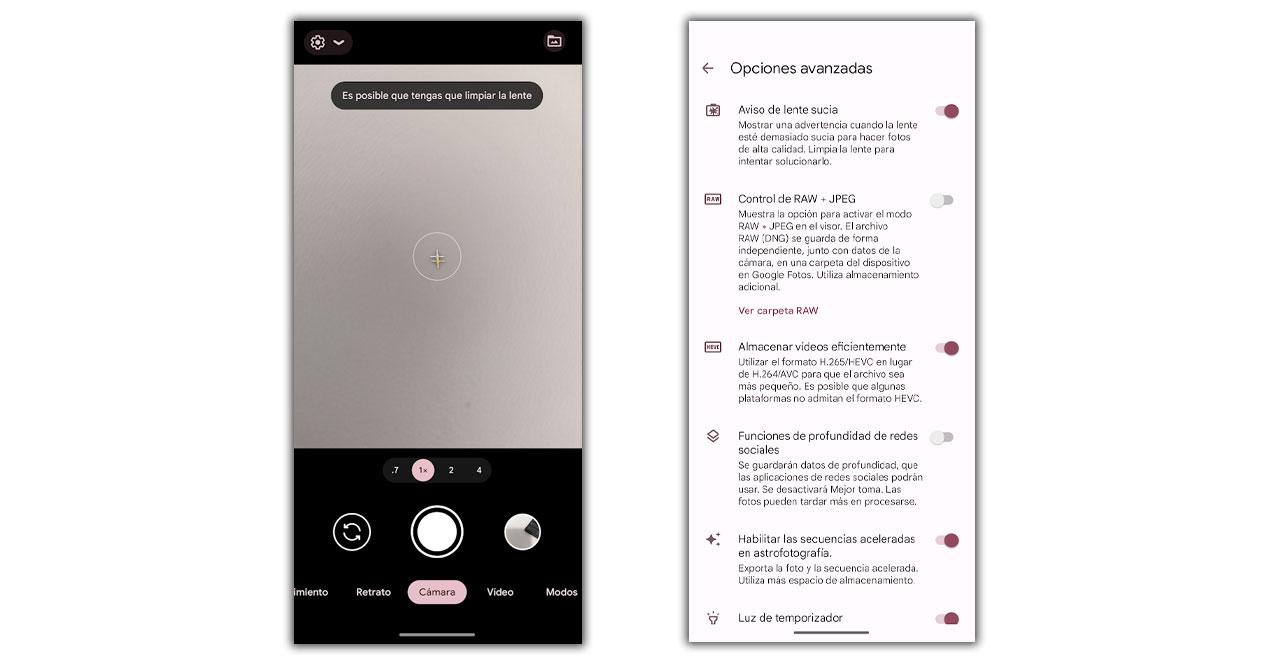
On this occasion, the steps lead us to enter the camera options, touch the ‘More settings’ button, then Advanced options and finally activate the Dirty lens warning.
In the same way that it happens in the iPhone, the Google Pixel has the ability, with this point activated, to export the depth information so that on Instagram or Facebook, among other networks, the images keep the focus in their greatest capacity. This, however, consumes more resources and may cause processing to take a few more seconds. To activate it, we find it in the Advanced camera options.
Framing Tips
For several years, smartphones have been integrating this tool, which is very helpful for not have a crooked image. When we see the image through the screen, we may not really perceive the position and later in the gallery we will realize the error. But in the Google Pixel settings, this will mark a before and after, because when pointing to any landscape, person or object, it will tell us if it is better to tilt it to one side or the other, so that the result is ideal.
![]()
White balance and exposure
Last but not least, it is time for the manual settings, other options that we will locate in your camera settings. This is what allows us to touch a point on the screen, is to vary the live result, avoiding further editing. You only have to move the controllers up and down until you find the desired result.