


Although all phones come with their default camera app according to what the manufacturer thinks is best for squeezing the lenses, there are other alternative apps for the camera on Android. AND GCam is one of the best optionsthis being the official Google camera that natively integrates its Pixel mobiles, but that also extends to other devices.
Very recently, version 8.8 of GCam came out, bringing especially outstanding news in some sections such as night mode. Well, then we give you 10 tips with which to squeeze those functions and make your mobile photos look like never before, thanks to GCam.
The first trick is knowing how to install the app
If you don’t have a Google phone and you search Google Play for the app ‘Gcam’ (or ‘Google Camera’), don’t worry. It is not that we are talking about a ghost app or that it has disappeared, it is simply that the app is not available “officially” in the rest of Android. Does that mean it can’t be installed? Luckily not.
The way to download and install GCam, specifically its latest version (8.8) is through the installation of an APK. In this case you can find it on the website of celso azevedo. It is as simple as downloading the file and opening it to proceed with the installation.
Yes indeed, You must grant permissions for the installation of apps of unknown origin. This can be done from the settings, generally in the ‘Applications’ section. However, if you have this option disabled when you try to open the file, a warning will appear that includes quick access to the settings to grant permission.
Google Camera (GCam)
Set the grid and say goodbye to crooked photos
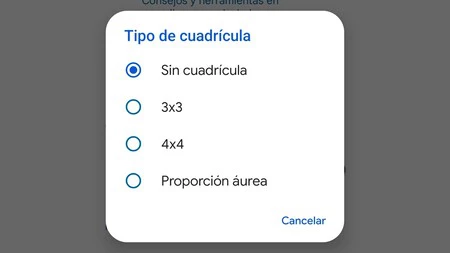
If there is a basic function in all photo editing, it is to be able to rotate and straighten the images when they came out crooked. However, this may involve some cropping of the image and if you do not want to lose details when putting the photograph at the correct angleit is best to set a grid.
This will help you to better position the mobile when you are going to shoot. And for that you must access the app settings (from camera mode, by clicking on the gear-shaped icon and going to ‘More settings’). Within ‘Grid type’ you can choose a 3×3, 4×4 or with a golden ratio.

By the way, we also recommend that you activate the framing tips that appear just above ‘Grid type’, which will cause the app to show you small help messages so that the photo comes out in the best frame possible.
Change the image format

It is not that GCam is characterized by offering a multitude of modes for the image format of the photographs, but it does offer two very different ones. On the one hand the format 16:9 for more panoramic photos and on the other the format 4:3 for squarer photos without actually being.
These options can be changed within settingsbut without the need to go to ‘More settings’, since they are one of the first to appear when entering from a photography mode.
Create your own ‘Street View’ with spherical photographs
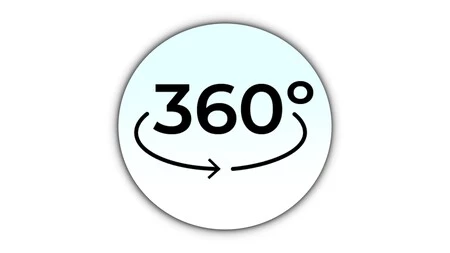
A really striking option of this application is that it allows create 360º photos. Be careful, not panoramic, but those that include absolutely the entire scene including skies/ceilings and floors. To do this you must go to the tab at the bottom right and click on ‘Spherical photo’.
Once you are there you must go moving based on where the point is on the screen, trying to ensure that the objective is always centered according to it (you will see as soon as you put it on that it is very intuitive). You must capture each corner and when you have it complete, you will see that you can open the final result in full screen and scroll through the place with your fingers (or moving your mobile) as with any other 360º photograph.
Videos with the highest possible resolution
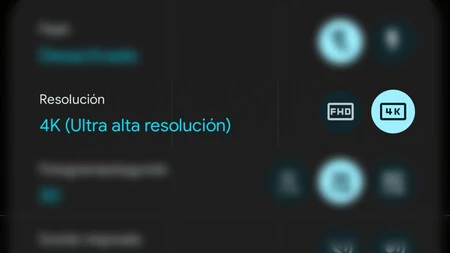
Out of the box, GCam may have standard resolution video recording configured. However, it is possible change the recording even to a 4K resolution if your mobile supports it. To do this you must enter the settings, but this time from the video mode.
Turn on HDR and RAW/JPEG control
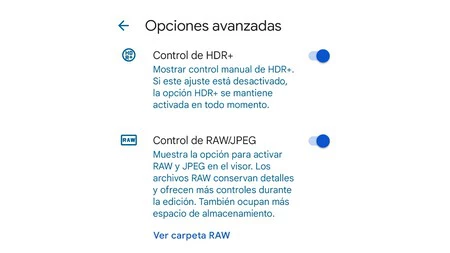
Continuing with the purpose of wanting to take the best photos, a good way to achieve this is with photos in RAW mode. If your mobile supports this high quality format for images, you must activate it in the settings. This time yes, within ‘More settings’ and then going to ‘Advanced options’. In the same place the option to control HDR manually will appear.

If you prefer to prioritize space over quality
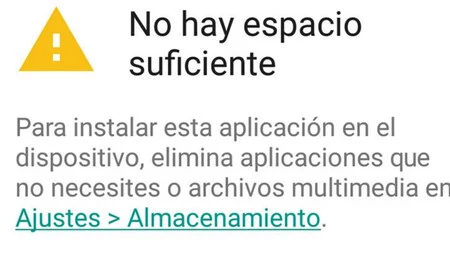
With the higher quality formats, it is clear that photos and videos will also increase in weight. so much that They could occupy a large part of the mobile storage. Whether it is to save space temporarily or permanently, you can find options in GCam that help the purpose.
The first of all will be to lower the resolution of the videos and deactivate the RAW and HDR that we talked about in previous points. The other thing is to go to ‘More settings’ and enter the ‘Device storage’ menu, where you will find different options that will allow you to save space including an extra option so that this option is deactivated if there is enough space. The icing on the cake is quick access to the ‘Google Files’ app to free up mobile space if necessary.

Google Lens built into the camera as standard

The functions and efficiency that Google Lens has makes it one of the most powerful camera tools. Translate texts, scan QR codes, look up what model of car you have found on the street, find out what type of plant is that that our neighbor has on the balcony… In short, a tool interesting enough to carry integrated as standard in the camera app without having to open the Google app.
Therefore, you must make sure that the option is activated in GCam, which can be Check within the app settings. In fact, it is among the first with a tab called ‘Google Lens Suggestions’.
We don’t always take the mobile in the best way when taking a photo, to the point that touching the screen with our fingers is uncomfortable and sometimes even impossible. However, in GCam we can set volume buttons to act as zoom or shutter. And yes, like the rest, it is within the app settings. Specifically, within ‘Gestures’.
Activate the best signal when the timer photo is shot

If you’re taking a timer photo, but you’re not in front of the screen, but in front of the camera, there’s a chance that you’ll move before the photo is taken, or you’ll spend several extra seconds posing to no avail. . Well then, you can make the flash emit flashes as a signal to know that, when they are finished, the photograph will have been taken.
To do this you must go to ‘More settings’ (yes, again) and click on ‘Advanced options’. Right at the end, you will see that the last option that appears is ‘timer light‘, which must have its corresponding tab activated for this function to activate when taking photos with a timer.
Bonus track (on some phones): make it your default camera app
If you are liking the experience of using GCam enough to want to convert it in the mobile default camera appyou should know that in some devices it is possible, although not in all.
All manufacturers offer the possibility to change the default app for the web browser, phone, sms or launcher, but they do not always add the camera as one of them. Some Xiaomi (not all) allow it. You just have to go to the settings and search for “default apps” or “default apps” and see if in the list of options you can change the camera app.
In Xataka Android | The phones with the best camera of 2023