


This heat map, offered by some applications, allows us to establish What are the points of our home where we have greater coverage? once we have already located our router. It can be used to move it (as far as possible) and improve coverage in the area that interests us, or to help us with a WiFi signal repeater or amplifier that allows us to increase coverage in certain areas. We can do it with the following application.
Create a heat map of your WiFi with WiFi Heatmap
As we have said, creating a heat map of our WiFi helps us detect trouble spots where the signal is not as strong as we would like. It is a very visual method to detect black dots and help us move the router to improve coverage, or even to know where to place repeaters that allow us to have full coverage throughout our home. Eye, also in an office. Here there is no discrimination for reasons of work.
For this, the mobile world offers us apps like the Wi-Fi Heatmap we found for Android. An application with a fairly simple use that also allows us to use a map of our home. It will be enough to photograph it and use the plan as a template for the application. Or if not, we will use one of the plans that the app offers us as a base, even if our house is not exactly the same as the standard one.
To create this plan we will have to open the app on our mobile and give you access to the permissions you ask us for, such as access to our networks. Thus, it will begin to measure the signal strength that reaches our mobile and we can click on ‘Create Heatmap’ at the bottom of the home screen to start creating our map.
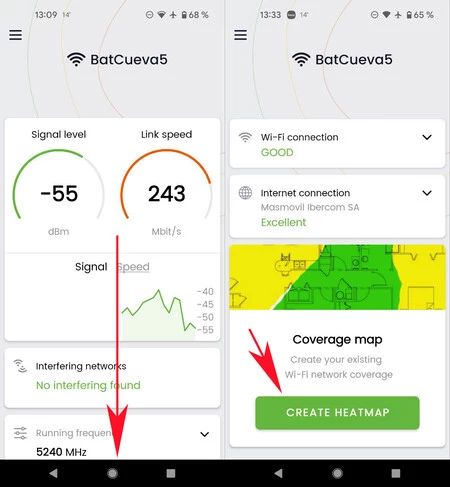
At the bottom of the cover we have the ‘Create Heatmap’ button to start building our heat map
This button will take us to a second screen called ‘My projects’ where we can store different heat maps. Like the one at home, the one at the office and the one at our parents’ or our partner’s house, for example. Or even heat maps of before and after the modifications that we make to our network. Very useful to be able to check if the changes have taken effect after the fact, by the way.
Once we click on the (+) button at the bottom, the app offers us upload our plan (Indoor), draw our own plan on the mobile screen (Draw your floor plan) or even use an outdoor map (Outdoor). With the plan already uploaded or drawn, we must decide the diameter that is going to be measured as we move. The smaller the diameter, the more precise the signal, but we will also need to take more measurements. At the taste of the consumer.
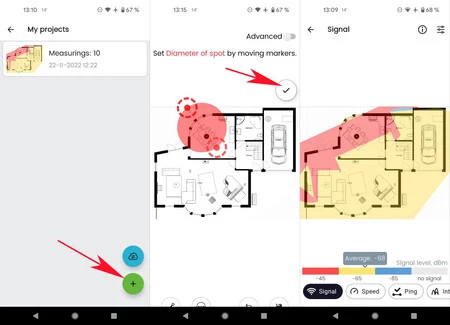
We decide whether to upload a plan or draw it, set the measurement radius, and build our heat map by moving around the house and taking measurements.
Once the measurement diameter has been decided, we can begin to take measurements. We will only have to drag the location point to the area of the plane where we are at any moment. Once located, click on the lower central button (the one under the decibels) and the area will be registered. The next is move to another point of the house, move the indicator on the map and take another measurement. So until we complete the entire house or area that we want to measure.
Once the complete heat map is created we can save it on our phone as a JPG file, something we do with the lower right button, the one with the icon of the computer diskette. Clever. We will have created a heat map of our home or office to be able to do “works”. That is, move the router to our liking or reinforce it with repeaters or other systems.
