


To improve the photos we use this format, but for this we must know some notions and learn to edit it. It’s not as easy as we usually do, but With some basic knowledge we can maximize the result that gives us the camera of our mobile.
What is the RAW format and what advantages does it have?
The RAW format is a digital file format used by images in which we have all the information captured by our team. A simple explanation is the following: when our mobile stores the photo we have taken in JPG, it has already applied some adjustments to the image that it captured with the camera, in this way the user receives an optimal final result that does not require more work. Nevertheless, when we shoot in RAW, we have a large file that contains all the data that the sensor has obtained.
RAW images can be previewed by the mobile gallery but if we look closely, at first glance it may seem that the compressed file has more quality, especially in sharpness, this happens because the compressed photo already has some adjustments applied. Well, if we edit the RAW we can get even more out to that beautiful sunset or to the photo of our family.
Saving photos in RAW format has a series of advantages:
- We do not lose information: In RAW, photos have lossless compression applied (as in JPG or PNG).
-
Allows subsequent changes and adjustments: having all the information, the user can apply changes and adjustments to achieve a more personal result. We can highlight certain elements that in other formats would have been lost.
-
Wider color gamut: the color gamut is extended because the RAW format stores more colors than JPG compressed images.
-
More freedom: We are free to make adjustments to our liking, if we want to do creative photography, this is our format. For example, we can create HDR photos using multiple shots.
Therefore, if you are starting in this world of photography, you cannot stop using the raw format so that your photos rise in terms of quality. This format has not been compatible with phones for a long time, so we must check first if our model is compatible.
Activate the RAW format in the camera of our mobile
Currently, many models from different manufacturers are compatible as standard with RAW images. Camera applications allow us to activate it from the settings, since it is not usually activated by default.
In the case of Google makes it easy for us and it is that we just have to go to “More settings”, “Advanced options”, and activate the “RAW + JPEG control” switch, as we see in the following image.
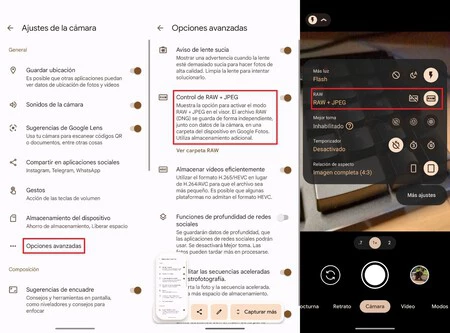
It’s very easy to enable RAW capture on Google Camera.
With the option activated, each photo we take will generate two images, one in JPG format and another in RAW. In this way, if we do not need editing or we want to upload it to social networks, the first one will suffice. On the contrary, we can edit the RAW image to improve it.
Other manufacturers like Samsung also includes it among its settings. If we have a mobile with One UI we must go to the Pro mode of the camera, click on the settings icon that is at the top and move to the “Advanced image options” section. In this section, we will be shown the option to “RAW Copies”, we activate it and that’s it. Even so, not all of the firm’s models are capable of obtaining images without compression.

How to edit images in RAW format
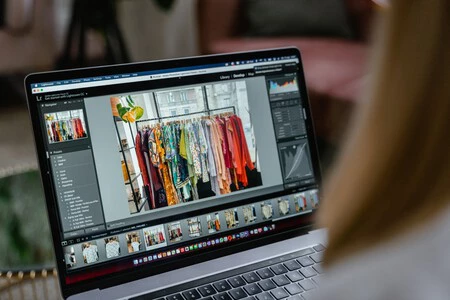
When editing, we have Many options to choose from. Doing a search in the application store, Google Play Store, we found very valid applications such as Lightroom, although the favorite of many is Snapseed.
This app is capable of viewing RAW images and allows us to edit them in a simple way. The application’s interface is intuitive, so you won’t have much difficulty when it comes to editing images. To begin, click on the “+” symbol to open a file, select the photo in RAW format (each manufacturer can use formats such as DNG or TIFF). When you see the image on the mobile screen, we will see a welcome to RAW development.
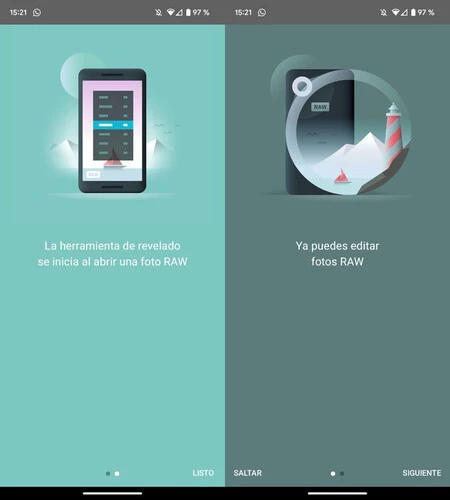
When we finish the brief introduction to the developer tool, we’ll be ready to proceed with editing it. At the bottom we will see two icons, one for the options to modify and another for the white adjustment. If we touch the first one, the elements that we can edit such as exposure, shadows, contrast, saturation or color temperature. If we play with these values, we will see the effect it has on the image in real time. In the second icon, we can modify the white balance, if we don’t know which balance is most suitable for our shot, we have an “Auto” mode that makes the process easier for us.
Editing a RAW image in Snapseed is not difficult at all, the application will show us the result of the photo so that we can assess if it is ready or not. Once we have finished, congratulations, we have made our first reveal or edition in RAW format. It’s a matter of spending time and going learning little by little to make your photos more impressive.

The result varies depending on the edition of the image. Nevertheless, the improvement is clear as soon as we begin to refine the retouching, as we can see in the following example. Colors are more realistic once developed, as well as offering better sharpness.

Photography in DNG and its development
How to take photos in RAW if your mobile camera is not compatible
As we have mentioned, most new models incorporate this option. However, if you are the owner of a mobile of a certain age, it may not be compatible. Check first if your smartphone’s native camera app has the option to take RAW photos. If you don’t see it anywhere, this may not be a match, but we’re still hopeful.
Capturing RAW photos on Android depends on a system API, the so-called “camera2api”. If your manufacturer did not enable the option, you definitely will not be able to take photos in this format. To check it, we must download the following app that will give us the answer.

Manual Camera Compatibility
If you are lucky, your model is compatible and even if your native camera does not allow it, you can always use third party apps They do their job in the same way. In this sense, we recommend an application that allows us to modify values before the capture, such as the aperture and the exposure time.

FV-5 Lite Camera
We would have everything ready to start taking advantage of the full potential of our mobile camera, editing the photos taken in RAW format. At first, it may seem like a complex taskBut it is quite the opposite.
Learning to edit in RAW is very easy, and from now on, we just have to learn step by step seeing the result of our images. I’m sure our photos look better now.