


Movistar+ Plus customers have a UHD decoder where possible view content in 4K and enjoy some integrated applications like Netflix, Disney+ or Prime Video. If you still have the classic decoder, you can request it for free if you are a Movistar customer.
In this article we review some points that are good to keep in mind for configure the decoder and enjoy the best image and sound quality possible.
How to know if I have the UHD deco and access the settings
To find out if you have the Movistar+ Plus UHD decoder, the only thing you have to look at is the design of the device itself. And it is that It is very similar to the router itself offered by the teleoperator with its fiber rates, although in a somewhat smaller format.
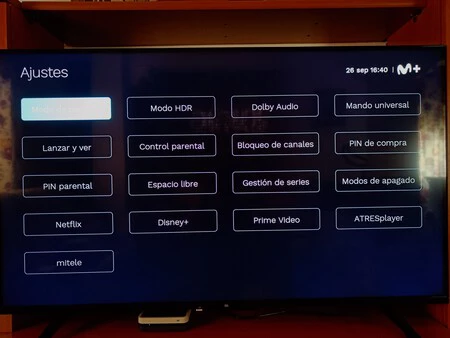
If you already have your Movistar+ Plus UHD decoder at home, entering the settings panel is very easy. All you have to do is press the button ‘Menu’ on the remote control and select the panel settings option, which is visible through the gear icon on the left.
In this menu we can configure any aspect of the decoder, although in our case we are going to focus on the options of ‘Screen mode’, ‘HDR mode’ and ‘Dolby Audio’which are the ones focused on modifying the image and sound parameters of the decoder.
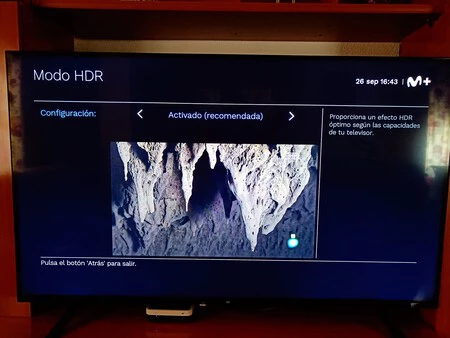
Automatic adjustment is useless, so it is preferable to disable HDR
One very important thing that we have to make clear is the following: practically all the channels that are reproduced from the Movistar deco emit in the BT.709 color space, that is, the color space allocated for content in SDR. This includes TV channels (both HD and SD), HD video on demand, and even channels M+ Champions League UHD, DAZN F1 4K, Eurosport UHD.
Just M+ LaLiga UHD and video on demand in UHD HDR are reproduced in the BT.2020 color space, reserved for high dynamic range (HDR) content. This color space offers a much broader spectrum, with more shades of color, and is definitely better than the BT.709 space. However, if we have HDR activated in the Movistar+ decoder, it will apply this effect to all channels, deteriorating image quality.
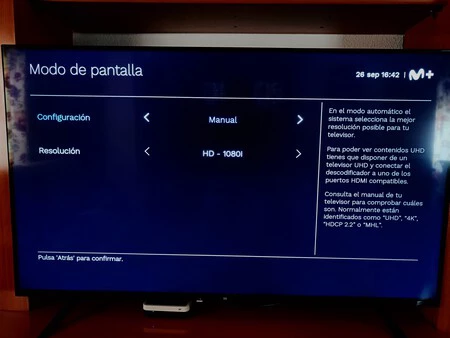
The problem does not end if we deactivate HDR from the options, since the decoder will continue to apply the BT.2020 color space to all content. However, there is a solution to prevent this from happening, and it is changing decoder resolution to 1080i. In this way, all the content that is broadcast from the decoder will be in SDR, with the appropriate color space for it (BT.709).

When we want to play content in 4K UHD and HDR, be it a football match from the M+ LaLiga UHD channel or a 4K HDR movie on demand, we can modify the deco settings back to ‘2160p and 50 fps’ and activating the HDR from the options.
The only downside to switching to 1080i or 1080p and turning off HDR is that It will not appear to us what content is in HDR and what is not from the native apps to watch movies or series on Movistar +, Netflix, Prime Video, Disney + and others. So the best we can do in this regard is to trust the apps of our Smart TV, HDMI dongle or TV-Box before those found in the Movistar UHD decoder.
The ideal in this sense is that Movistar lets us change the color space automatically and we do not have to change settings to have the best possible quality. The curious thing about it all is that the option to leave it on automatic exists, but it does nothingit just transforms everything to BT.2020 and wrong.
Activate Dolby Audio from the settings of the UHD deco
Another option worth taking a look at is the ‘Dolby Audio’ section. And it is that Movistar’s UHD decoder supports Dolby Digital Plus sound. This function is found in the Settings > Dolby Audio section.
To activate it, all we have to do is leave it on ‘On’, select the manual option and ‘Dolby Digital Plus. The content that is compatible with Dolby will appear in the information menu of each channel. The problem is that it is not specified if it is 2.0, 5.1 or Dolby Atmos.
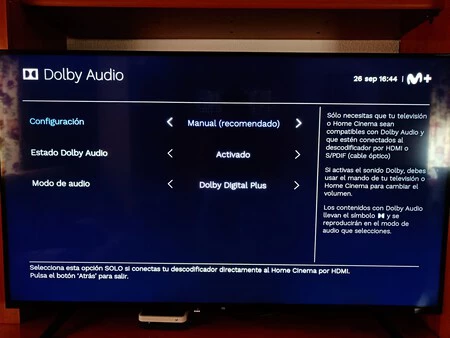
Of course, to enjoy the Dolby Digital Plus codec it is essential to have a team prepared for this configuration. In this way, we have to verify that our television is compatible with this audio format. However, even if it is compatible, the difference will not be as clear as having external audio equipment such as a Home Cinema, sound bar, etc.
To do the sound test once Dolby Audio has been activated, Movistar offers us a test demo to check that everything is in order. We can access it from the settings menu and pressing on Help > Discover more features > Settings. It will be here where we will find a section dedicated to Dolby Audio.